Ski Maintenance and Servicing
Looking after your equipment is extremely important if you want to get the most from your investment and max out on the fun factor for your skiing or snowboarding. There is nothing worse than skiing some amazing runs and constantly feeling like you are 'stop starting' or just not sliding well on the snow. If you have felt these sensations in the past (most notable in April when the snow has a high water content) then you know that waxing your skis is essential.
If you are renting then the rental shop will do this service for you but if you have your own gear you should look to get them serviced a minimum of once per week of use. If you snowboard then it is even more important. Having a slow sticky base on a flat section of piste will guarantee that you are walking rather than smooth gliding.
Tools you will need to service your own skis
- Rag or Cloth
- Iron with temperature settings
- Scraper (plastic for basic use or metal for use with Petex)
- Wax
- Wax remover
- Petex repair candle
- Vice or two old chairs
- 2 heavy duty elastic bands or string
- Edging tool
Irons and scrapers plus Petex, wax and wax remover are sold in most ski shops or can be purchased online. Wax comes in 3 different hardness compounds to suit different snow temperatures. The ranges are from +12°C to 0°C, 0°C to -6°C and colder than -6°C. Try and get wax that will be suited to the time of year that you are going. For example Japan will be a lot colder than say Andorra. Or if you are using on dry slopes in the UK then much warmer wax is required. Generic all temperature wax is available and is usually slightly cheaper but the performance is not as good.
Step One:
Dry your skis with a rag and make sure there is no dirt or moisture on them. Spray the wax remover onto the base and wipe them down with the cloth.
Step Two:
Heat your iron to the required temperature (the wax packaging will tell what this is depending on the wax type you are using). If you have a vice put the ski into it to hold it steady, if you don’t have a vice use two chairs (that you don’t mind getting wax on). Rest the tip of the ski on one chair and the tail on the other chair with the binding facing down and the base of the ski facing up. Using the elastic bands or string tie back the brakes of the binding so nothing obstructs the iron travelling along the length of the ski.
Step Three:
If you have deep gouges in the ski after hitting a rock then you need to fill the hole with replacement material called Petex, or a repair candle. Light the end and it will start to melt and drip. Apply to the gouge in layers and make sure it is fully dry before waxing over the top.
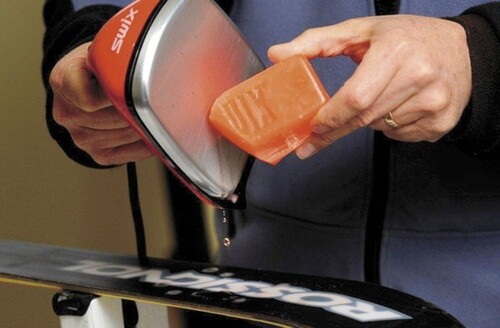
Step Four:
Hold the wax against the hot iron and that too will start to melt and drip. Hold the iron so that the drips of wax fall onto the base of the ski. As it starts dripping move along the length of the ski so you have a drop of wax every centimetre or so along the whole length of the ski.
Step Five:
Once the wax is on the ski you iron it in using the hot iron to spread the wax evenly along the length of the ski. Make sure there are no gaps and add more wax if the whole base is not covered. Take care not to hold the hot iron in one spot for too long.
Step Six:
Once the whole ski is covered with an even thin layer of wax leave it over night to cool down and for the pores of the base to fully absorb the wax.
Step Seven:
Scrape off the excess wax with the plastic scraper. Make sure you do this somewhere which is not carpeted and is easy to sweep the floor afterwards. Where Petex has been used use a metal scraper as it sets very hard and a plastic scrapper will not work very well.
This process is very quick and easy once you get the hang of it. There are plenty of tutorial videos on Youtube and in the long run, once you have invested in the tools, it will save you lots of money as you won’t have to pay over the odds for a shop to do it for you. Saying that the shop will often use a proper machine which is better than doing it by hand, although not as fun.
The steps above are the same for snowboards except you need more wax as the base has a larger surface area.
Creating a proper edge for your skis
Be careful – this is very easy to get wrong so we recommend that you ask a shop to do it if you are not confident. Buy an edge tool which you can set at different angles. Once the right angle is set run the tool along the edge in one direction only to sharpen it. Speak to a ski tech about the best degree angle to use for your skiing style.
Other Ski Maintenance points worth mentioning
- Always take your liners out of your boots and dry them. Avoid direct contact with hot radiators
- Do the buckles on your boots up when you are not using them. Not tightly but just to hold the shape of the boot
- Keep an eye on the heels and toes of your boots if they wear down too much they will not be safe in your ski bindings. Replacements are available for the majority of boots these days but if not use Cat Tracks (rubber protection for the soles of your boots) to stop them wearing away
Storing your skis or snowboard
- Always store at room temperature nowhere too hot or too cold, avoid attics as they are hot in summer and cold in winter. In cardboard or under the bed is ideal
- If you know you will not be skiing for a few months buy some storage wax and follow steps one to six above but don’t scrape the wax off and leave them until your next trip. Just before you travel scrape off the storage wax and re-service with proper wax